Resources
The workflows that i have used here. Excluding Supir and CSSR. 13 Kb
This article is also available as a PDF. 3 Mb
To save the file right click at the button, and choose save as.
Preface
Initial thoughts
I had initially planned to create an ultimate video upscaling workflow for ComfyUI. Just drop the video, press the queue button, and be happy. However, I soon realized that such a workflow does not exist. The approach depends on too many factors, and each input video requires a slightly different treatment. Other settings. Or simply other methods.
Upscaling a cartoon is different from upscaling a nature documentary. The desired output size plays a role. The weight used also makes a difference. Whether you want it to be quick and dirty or take all the time in the world matters. And of course, how good your PC is that’s doing the processing counts as well.
It’s also very important to consider the size of the input video and how it was created. Videos made with AnimateDiff have already a size problem. AnimateDiff was trained with images of 512×512 pixels. To create a 16:9 video, you even need to downscale further so that AnimateDiff can deliver useful results. I usually start my AnimateDiff workflows with 624 x 352 or 568 x 320 pixels. And then details like faces might become an undefined pixel mess. Therefore, I wouldn’t simply upscale such a video. There’s not enough image information to upscale. Instead, I would use a second (K) sampler to recompute the video.
There are many factors at play here, and that’s why there cannot be one workflow for everything. That’s why I’m providing a brief overview of the current methods instead. The workflows are included in a zip file.
I’m intentionally not discussing details or explaining nodes here as it would go beyond this text’s scope. There are already many articles dealing with the Ksampler and upscaling in general already. Instead, I’m just giving a rough overview of the methods. And describe some pitfalls.
Tom Goodnoise – 13.01.2025
Workflow integration
You have to decide for yourself whether you want to do the upscaling in your own upscaling workflow or integrate it into an existing workflow. There are many opinions on this.
The advantage of integrating it is that an intermediate step is eliminated. And the image material is not compressed into a video. A little quality is always lost in the process. The disadvantage is called OOM. Out of Memory. This can work, but it can also fail due to a lack of RAM. Personally, I like to have everything in one workflow. As long as it works. In the examples here, the method is of course separated.
Hardware
My hardware: I currently use a rather outdated 5800 X3D processor, 32 GB of RAM, and an NVIDIA GeForce RTX 4060 TI with 16 GB of VRAM. My old graphics card, which I used for my Animatediff videos, was an NVIDIA GeForce RTX 3060 TI with 8 GB of VRAM. Therefore, I’m familiar with the pain of daily OOMs and know that some things can’t be realized because of memory constraints. Lots of workflows simply failed. If you want to work with AI, do yourself a favor and get at least one card with 12 GB of VRAM.
Methods
Please note that I didn’t invent these methods. They’ve been available for a while now. I’m just providing a brief overview of them as an overview.
For my tests use a input video in the size of 720 x 480 here, created with Cogvideo. With a length of 6 seconds in 24 frames per second. And upscale it by factor 2.
The methods are as follows …
External
Let’s start by not doing the upscaling in ComfyUI at all, but for example with Topaz Video Upscaler, which is a leading solution in the industry. Or with the Super Scale feature in the commercial version of DaVinci Resolve. Both are paid solutions (Super Scale is only available in the Studio version of DaVinci Resolve) that produce a very good result. Both use AI-based upscaling methods.
https://www.topazlabs.com/topaz-video-ai
https://www.blackmagicdesign.com/de/products/davinciresolve
Supersimple
In ComfyUI the simplest method is to simply connect a Video Input Node to an Upscale Node and from there directly to the Video Combine Node. So you get no details about it. It just upscales the pixels bigger. As if you were enlarging an image in Photoshop.
My example video with 6 seconds length and 720×480 resolution was scaled up to double size in 10 seconds.
With an AI Upscale Model
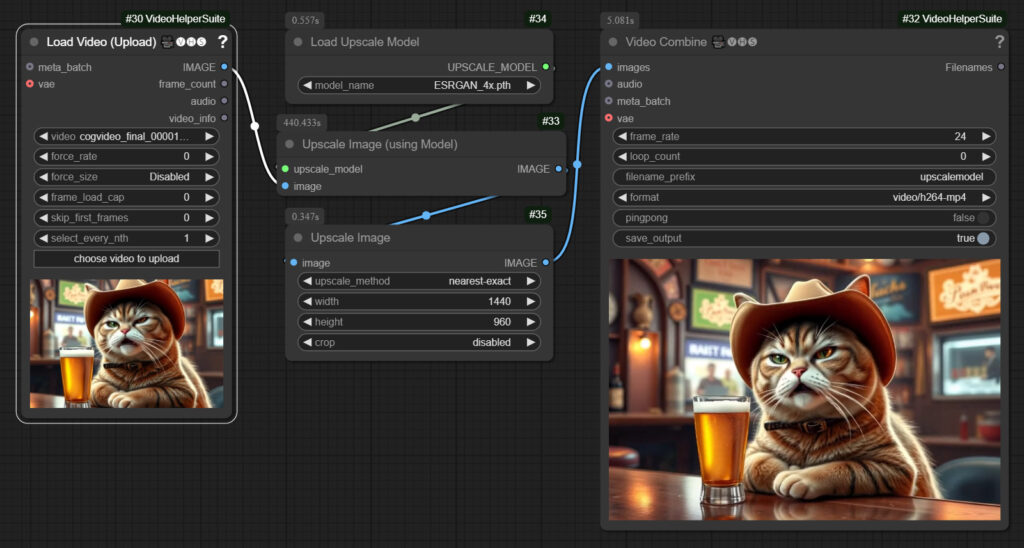
There is an upscale image node with which you can use an AI upscale model. One of the older and better known models is ESRGan. Upscale models add details. And depending on the model, in a slightly different way. For example, hair is shown at a much higher resolution.
For many videos, this is sufficient. Especially when you consider that the new video generators such as Hunyuan or CogVideo now work at a fairly high resolution. The minimum size for CogVideo is 720×480. And the latest version can do twice the size.
Of course, the whole thing takes a little longer than just upscaling the images. But the quality has improved. The cat’s fur is now much more detailed.
The workflow took 7.4 minutes for my 6 second example video. This could be reduced a little by not using a 4x upscaler but only a 2x one, thus avoiding the downscaling. But oversampling adds even to the quality. And a simple upscale node can then downscale to the needed resolution. It does not only upscale.
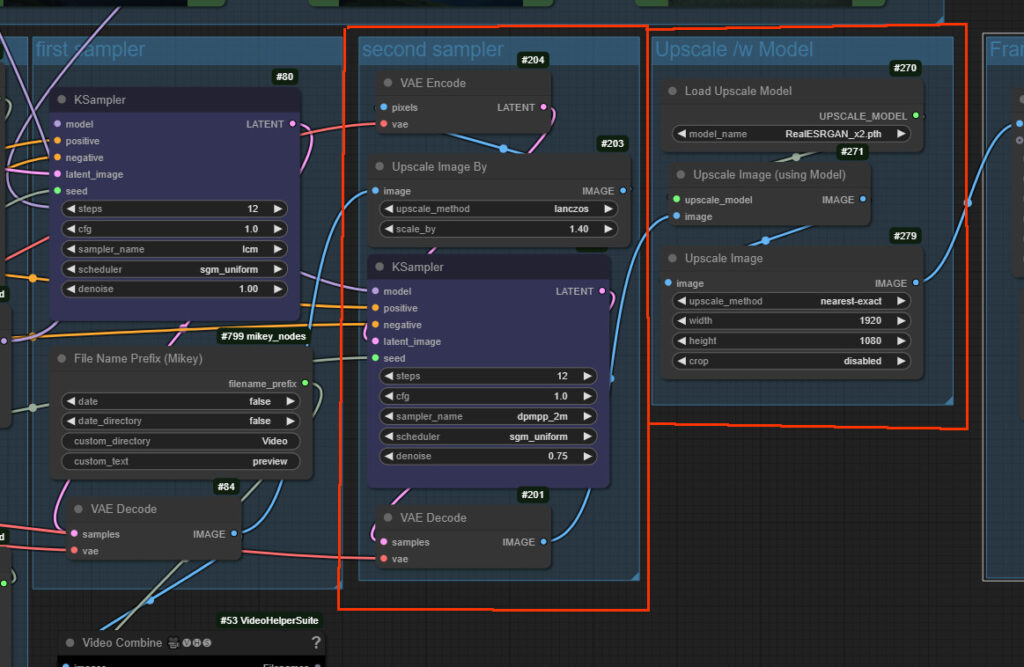
The caveat is that with the 4x models you might run out of memory. I had this with my old 8 gb graphics card. And used the 2x RealESRGan upscale model then.
You can find upscaling models here, for example: https://openmodeldb.info/
Supersimple + AI Upscale Model
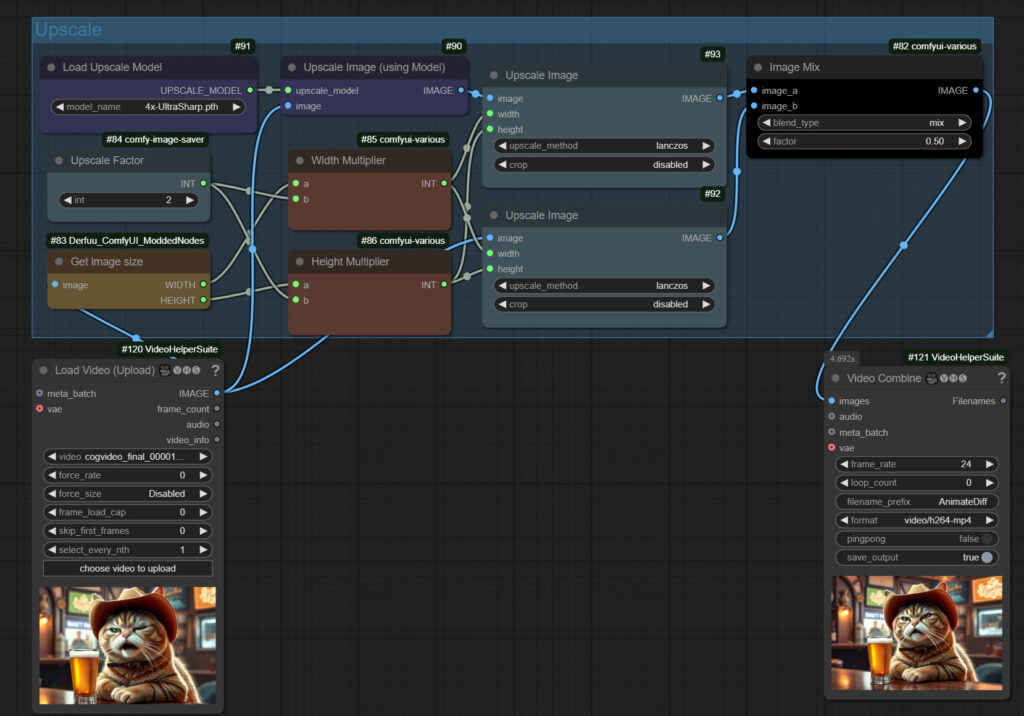
The AI Upscale Model method can sometimes do too much of a good thing. Depending on the model used. There can be unsightly artifacts, or the whole thing can be too sharp. You can counteract this somewhat by mixing the two methods above.
One line works with an upscaling model. One line works with simple upscaling. And then you mix the two images together.
The workflow took a little over 8 minutes for my 6 second example video in 720×480 resolution.
Supir and CSSR
https://github.com/kijai/ComfyUI-SUPIR
https://github.com/kijai/ComfyUI-CCSR
Supir and CSSR are both custom nodes for ComfyUI that are specifically designed for upscaling images and videos. They promise a quality that comes close to the result of the video upscaling industry leader Topaz Video. Both have a major performance problem, however.
I managed to get both workflows to work. But both times I stopped the workflow and didn’t let it finish. So I can’t even say anything about the quality. Ten minutes or more for an image at 24 frames per second was just not fun for me. And with Supir there is a licensing problem on top of that. It is not licensed for commercial use.
You have to install CCSR via the Github URL. You can install Supir from the ComfyUI Manager. There is a trap lurking here. The folder in ComfyUI\custom_nodes is created with lowercase letters. And then the download node that automatically downloads the Supir model in the workflow doesn’t work. So make sure you rename the folder to ComfyUI-Supir before you start.
Both workflows are the standard workflows from the respective Examples folder of the Custom Nodes. I simply replaced the image nodes with video nodes. I’m skipping the workflows for this reason. And also because of the incredibly long calculation time. That’s simply too slow for most offline purposes.
KSampler Upscaling with AnimateDiff
The heart of every AI image generation is a sampler. For stable diffusion, this is a KSampler. For the images, AI Flux, the Flux Sampler. For the video AI Cogvideo, the Cogvideo Sampler, and so on.
And this is where it starts to get a bit more complicated. Because you can’t just run the video through a KSampler again. The images then have no connection. Because each image is then randomly “improved”. It then flickers. What you need is another pass through a video model. For consistency. And as far as I know, there is currently only AnimateDiff for this. And that then runs via a stable diffusion weight and a KSampler. And to complicate things further, there are currently three AnimateDiff models. The most common version is AnimateDiff 2 LCM. Simply because there is also Loras for this and it works very quickly.
Scaling via a KSampler does come at a price, however. The result does not correspond 100% to the input. A new video is created, so to speak. The images are recalculated and new details are added. This can change the colors. Or the entire look. Each stable diffusion weight also gives a slightly different result. Which is why it is best to use the same weight for creating and upscaling.
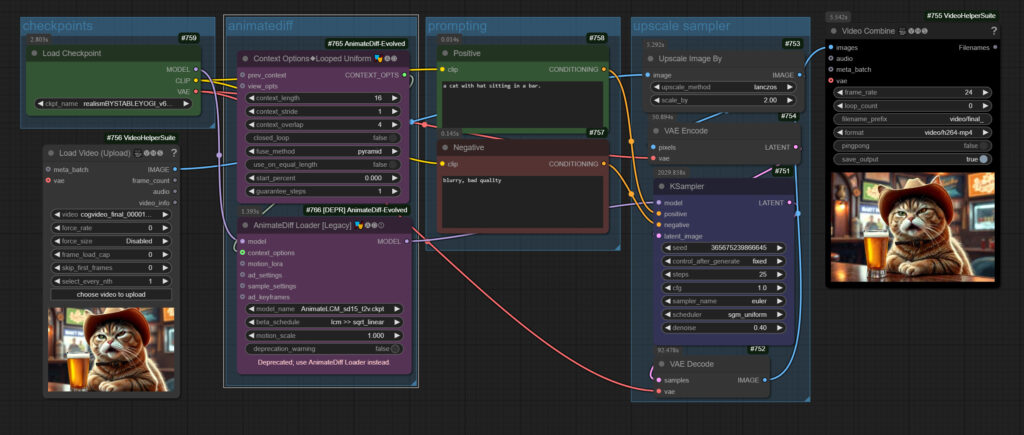
And you have to incorporate a prompt somehow. Be it in text form or via image analysis. The best thing would of course be the original prompt. Which brings us back to the topic of whether you should integrate an upscaling workflow into the original workflow. Which I have done many times before. Here in an AnimateDiff workflow.
Back to the initial issue. We need a ksampler and AnimateDiff for coherent results. Let’s pick AnimateDiff LCM since it is fast. And generates better results than AnimateDiff 2 and 3.
This leads us to the first pitfall. You would think that if you are already using AnimateDiff LCM, you can also use the LCM method in the Ksampler. This works quite well in the workflow in which you create the video. In the first instance of the Ksampler. But here, when upscaling in the second Ksampler, there is practically nothing left of the cat with the LCM method.
It still flickers a little. Not quite as much as if you did it without AnimateDiff. But it’s visible. Like a bad Super 8 film. Which you unfortunately can’t see in the shot here. It might help to increase the samples further. But the result looks a lot like the input video.
It just needs a few more steps to refine it.
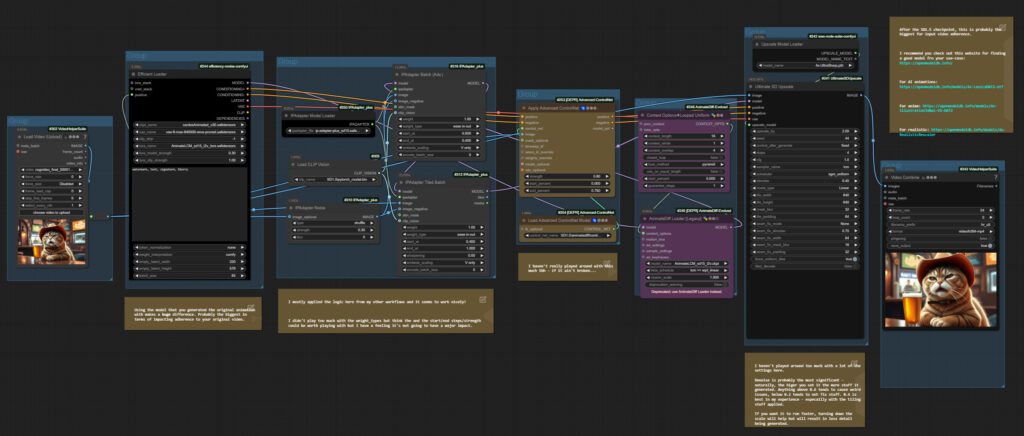
That’s exactly what Banodoco did in his supermegabadassupscaler workflow. In his workflow there is an IP adapter that replaces the prompt. And a Controlnet instance that ensures even more coherence. And he uses the Ultimate SD Upscale Node, which enables tiling. That way you don’t run into OOMs so quickly. An upscale model is also in play. And his workflow actually delivers an impressive, fairly coherent and pretty flicker-free result.
The workflow took a little over 24 minutes for my 6 second sample video in 720×480 resolution. Despite tiling, Ultimate Upscale is even faster than using a pure Ksampler.
The workflow took a little over 24 minutes for my 6 second sample video in 720×480 resolution. Despite tiling, Ultimate Upscale is even faster than using a pure Ksampler.
Let’s have a look at ther result.

On the left is a shot from the upscaled video. On the right is a shot from the original video, simply scaled up in affinty photo for comparison. After upscaling, the video has gained some very nice details that you can’t see here in the image. The speech animation runs now much smoother, there were some artifacts and deformations on the mouth when speaking. Everything is smoother.
But at the same time you may notice that there is a certain difference now, compared to the input image. This highly optimized workflow creates a now relatively flicker-free video. But with the improvements it no longer comes quite close to the original. The cat’s fur has lost some of its variation overall. The colors are also slightly changed. I could now reduce the noise and toy around with the samples. Or simply use another AI weight. But then i might end in a not so smooth animation again.
That is the price you pay for upscaling using a Ksampler. You can get pretty close. But depending on the selected AI weight, the selected denoise factor and the other settings, the result can vary quite significantly. Ksamplers simply recalculates the video.
Summary
There is no one upscaling workflow that makes everyone happy. It all depends. With a video made with AnimateDiff, where you have a pixel mesh anyways, it is recommended to upscale with a Ksampler. This way you get the missing details and eliminate quite a few inconsistencies. With videos created with other methods, I would rather rely on upscaling with a model.
I hope i could help to make some decisions here.
Tom Goodnoise – 14.01.2025


